


Underfloor heating offers homeowners an efficient way to stay warm during Melbourne winters without using too much energy. Radiators only heat air around them while underfloor heating emits radiant heat across your entire floor, offering greater comfort while simultaneously cutting your energy costs and getting rid of cold spots in your home. We will explain the basics behind how underfloor heating works as well as its various forms and what to expect during its installation in this guide – especially important if hiring professional plumbing services from Melbourne!
Why Choose Underfloor Heating?
Its Underfloor heating gives your floors a steady, gentle warmth while being virtually invisible from view – which fits in well with modern interior designs and frees up more floor space in which to decorate! Furthermore, its hidden design means it fits more discreetly without taking away from modern interior designs aesthetically. Also eliminating wall-hanging heaters gives more ways for decorating possibilities!
Underfloor heating systems operate at lower temperatures than regular radiators, making them better for the environment and more cost-efficient than using forced-air systems to warm rooms. Furthermore, underfloor systems reduce allergen release by blocking dust accumulation that would otherwise travel around via forced air systems. They’re great solutions for people suffering from allergies who want something closer to a room-heating approach than forced-air models can.
Underfloor Heating Systems
There are two basic kinds of underfloor heating systems. They include electric and hydronic.
- Electrical (dry) Systems
Rather than use liquid solutions like in a wet system, electrical dry systems consist of electric cables or mats buried under the floor to power any necessary accessories for easy and fast setup – perfect for renovation of already-existing spaces such as kitchens or bathrooms.
- Hydronic (wet) Systems
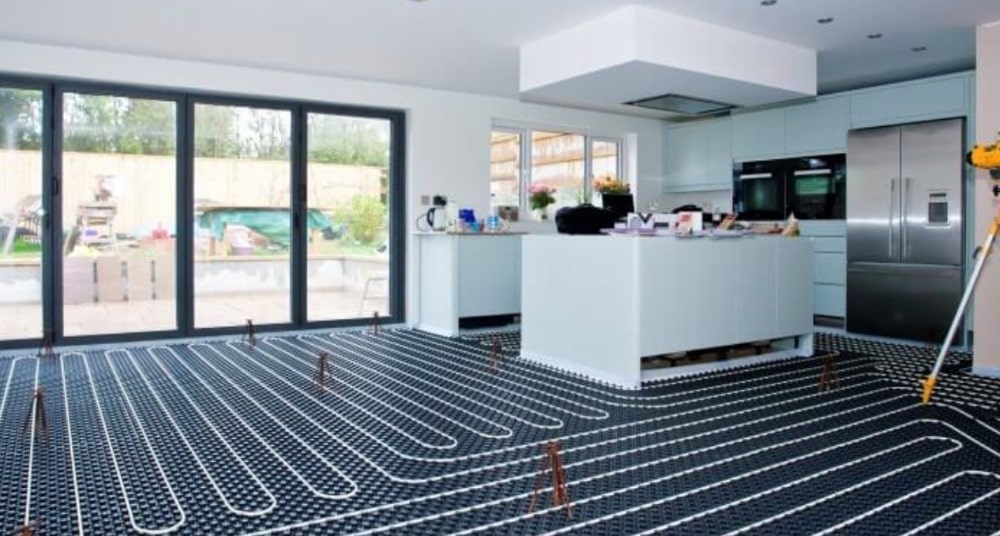
Hydronic systems involve connecting pipes from a boiler or heat pump and moving warm water across floors in the room. While more expensive to initially set up than alternative options, hydronic systems save significantly in terms of long term costs when installed for large spaces like homes.
Steps For Installing
Electric systems may be easier for DIY installation than hydronic ones, though professional installation should always be sought when possible – particularly hydronic systems in Victoria or Melbourne where licensed plumbers ensure everything is completed to Australian safety standards and safely.
Here is what to anticipate:
Step 1: Evaluate Your Current Flooring
To properly select and install new floors, the existing one needs to be assessed first. Based on factors like flooring type, room layout and insulation needs, professional plumbers or heating experts will select an optimal system that best matches you needs and budget.
Step 2: Prepping The Subfloor
For optimal energy use and low costs, insulation boards may first be added on top to keep heat from escaping down through. To keep energy costs manageable, insulation boards may then be laid over them as an added measure to retain warmth from radiating upward.
Step 3: Installing The Heating System
For electric systems, heating mats or cables need to be spread out evenly in rows along their entirety and spaced evenly apart. A plumber in Melbourne then creates an intricate network of pipes in a snake-like formation and secures them using clips or rails as part of hydronic heating systems.
Step 4: Enabling Power Or Water To Operate
A licensed electrician should connect the thermostat, main electrical source and main electric panel of electric systems, while an experienced Melbourne plumber must make this connection for hydronic heating systems connected to a boiler/heat pump system.
Step 5: Enclosing Heating Elements
Once the system has been assembled and tested to make sure everything works as it should, its functionality should be checked against an independent test source to make sure everything runs as expected. Once all components have completely dried out, an auto-levelling compound such as screed or self-levelling compound should be applied over heating elements or pipes containing them to protect them before final flooring materials such as tiles, laminate, and carpet can be laid later.
Step 6: Final Installation And Testing
Once your floor is installed, take one last look at its system by connecting smart home thermostats or devices that support it to control its temperature easily.
Final Thoughts
Energy efficient homes will find underfloor heating an invaluable addition. Not only is it sleek and quiet to operate but is an efficient alternative to more traditional methods of warming their space. Assuring an effortless installation experience requires planning ahead by hiring a licensed plumber in Melbourne.
Underfloor heating adds both comfort and value to any room of the home; no professional is necessary; just select top quality materials to achieve great results and enjoy toasty feet during all four seasons of winter!